 Doomsday Defense
Historical text (1881). Trapping is tightly regulated today: seasons, licenses, trap types and target species. Some methods described here (including poisons) are illegal. Know your state's rules.
Camp Life in the Woods and the Tricks of Trapping and Trap Making · 1881
Book III — Traps for Feathered Game (part 2 of 3)
THE SPRING NET TRAP.
Although slightly complicated in construction, our next illustration presents one of the prettiest bird traps on record, and may be made in the following manner, and by frequently referring to the picture, our explanation will be easily understood.
The first step is to make or procure a low flat box, about fifteen inches long, by ten inches in width, with a depth of about two inches. Next fasten an interior box, of the same Page 81 height, leaving a space of about three-quarters of an inch between them all round. A platform should now be made. Let it be of such a size that it will just fit in the interior box, with a very slight space all around its edge. It should then be pivoted in the upper part of this box by two small slender pins, one being driven through into its edge, at the centre of each end. Let it be sensitively poised. The next thing to be done, is to arrange the spindle and catch. The latter should consist of a tack or small bit of wood fastened on the middle of the platform, about an inch from one end, as seen both in the main illustration and in the diagram at (b).
The spindle should consist of a flat piece of wood, secured with a leather hinge to the edge of the outside box, directly opposite 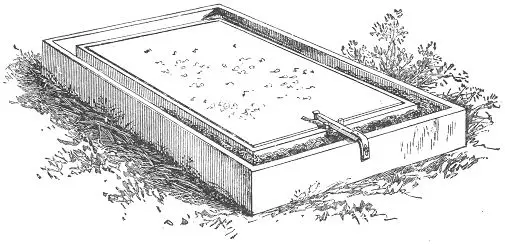 the catch. Let it be long enough to reach and barely hold itself beneath the catch. When thus in its position, two small plugs should next be driven into the edge of the inner box, one on each side of the spindle, thus holding it in place. A glance at our illustration makes this clear. The netting and “hoop” are next in order. The hoop should consist of an iron wire of the diameter of common telegraph wire.
For a box of the size we have given, a length of about twenty-eight inches will be found to answer. Before making the hoop, however, its hinges should be ready for it. Two screw eyes, or staples of bent wire should be driven into the bottom of the box between the two walls, one in the exact middle of each side. The iron wire should now be bent so as to fit round and settle into the space between the boxes, letting each end rest Page 82 over the screws in the bottom. It will be found that there will be enough surplus wire on each end to form into a loop with the pincers. These loops should be passed through the screws or rings already inserted, and then pinched together; the hinge will thus be made, and will appear as at (c). If properly done, they should allow the hoop to pass freely from one end of the box to the other, and settle easily between the partitions. If this hinge should prove too complicated for our young readers, they may resort to another method, which, although not so durable, will answer very well. In this case the wire will only need to reach to the exact middle of the long sides. No surplus being necessary, a length of twenty-six inches will be exactly right. On each end a short loop of tough Indian twine should be tied. By now fastening these loops to the bottom of the box with tacks, in the place of screws, it will form a hinge which will answer the purpose of the more complicated one.

The netting should consist of common mosquito gauze, or, if this cannot be had, any thin cloth may be substituted. It should be sewed fast to the iron wire, from hinge to hinge, and then, with the hoops resting in its groove, the netting should be drawn over the platform, and tacked to the bottom of the groove, on its remaining half. It should rest loosely over the platform to allow plenty of space for the bird.
But one more addition, and the trap is finished. We have mentioned the use of elastics in other varieties: they are of equal use here, and should be attached to the hoop as seen at (a) in the section drawing, the remaining ends being fastened to the bottom of the groove, as there indicated. These elastics should be placed on both sides, and stretched to such a tension as will draw the hoop quickly from one side to the other.
It will now be easy to set the trap. Draw the hoop back to the opposite end, tucking the netting into the groove; lower the spindle over it, resting it between the two little plugs, and securing its end beneath the catch on the platform. If the bait, Page 83 consisting of bread-crumbs, berries, insects, or the like, be now sprinkled on the platform, the trap is ready for its feathered victim. It will easily be seen that the slightest weight on either side of this poised platform will throw the catch from the end of the spindle, and release the hoop and the platform in an instant is covered by the net, capturing whatever unlucky little bird may have chanced to jump upon it. This is a very pretty little trap, and will well repay the trouble of making it.
A SIMPLER NET TRAP.
Much ingenuity has been displayed in the construction of bird traps of various kinds, but often the ingenuity has been misplaced, and the result has been so complicated as to mar its usefulness for practical purposes. The examples of net traps presented in this volume are so simple that the merest tyro can readily understand them. What can be more so than the present example, and yet it is as sure in its effect, and surer than those other varieties of more complicated construction. One necessary element in a trap of any kind is, that the bearings are slight and that they spring 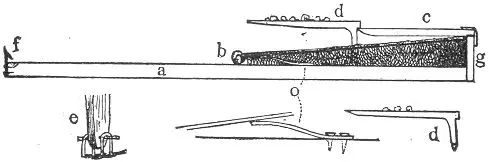 easily. To obtain this requisite it is necessary to overcome friction as much as possible, using only a small number of pieces, and having as few joints and hinges only as are absolutely necessary. The present variety possesses advantages on this account. It is constructed somewhat on the principle of the ordinary steel trap, and also resembles in other respects the one we have just described, although much simpler. We give only a section drawing, as this will be sufficient. The long side of a flat board of about eight by sixteen inches is shown at (a); (b) indicates the loops of a bent wire, to which the netting is attached, as in the trap just described, Page 84 the loops being fastened to the board as in the other variety; (g) consists of a small bit of wood an inch or so in length and half an inch in width. It should be tacked on to the middle of the one end of the board and project about a half inch above the surface. To the top of this the spindle (c) should be attached by a leather or staple hinge. The spindle should be of light pine, five inches in length and a quarter of an inch square, bevelled; on the under side of one end (d) is the catch or bait piece, and should be whittled out of a shingle or pine stick of the shape shown, the width being about a half an inch or less. One side should be supplied with a slight notch for the reception of the spindle, and the other should project out two or three inches, being covered on the top with a little platform of pasteboard, tin, or thin wood either glued or tacked in place. To attach this piece to the main board, two small wire staples may be used, one being inserted into the bottom end of the piece and the other being hooked through it, and afterward tacked to the bottom of the trap, thus forming a loop hinge. Another method is to make a hole through the lower tip of the bait piece by the aid of a red-hot wire, as seen at (d), afterwards inserting a pin and overlapping its ends with two staples driven into the bottom board, as shown at (e). In our last mentioned net trap the spring power consisted of rubber elastic, and the same may be used in this case, if desired, but by way of variety we here introduce another form of spring which may be successfully employed in the construction of traps of various kinds. It is shown at (o) and consists merely of a piece of tempered hoop iron, so bent as to act with an upward pressure. It should be about three inches long by half an inch wide. About three-quarters of an inch should be allowed for the two screws by which it is to be attached to the board. The rest should be bent upward and thus tempered by first heating almost to redness, and then cooling in cold water.
One of these springs should be fastened to the board on each side, directly under the wire and quite near the hinge, in the position shown in the main drawing. Now draw back the net, lower the spindle and catch its extremity in the notch of the bait piece, and the trap is set as in our illustration. Sprinkle the bait on the platform, and lay the machine on the ground where birds are known to frequent; and it is only a matter of a few hours or perhaps minutes, before it will prove its efficacy. In order to prevent the bird from raising the wire and thereby Page 85 escaping, it is well to fasten a little tin catch (f) at the end of the board. This will spring over the wire and hold it in its place.
THE UPRIGHT NET TRAP.
The following is another novelty in the way of a bird-trap, somewhat similar to the one we have just described, in its manner of working.
Procure two pieces of board about a foot square. Nail one to the edge of the other, as represented in our engraving. A stout wire is the next requisite. It should be about thirty inches long, and bent either into a curve or into two corners, making three equal sides. Each end of the wire should then be bent into a very small loop for the hinge. On to this wire the netting should then be secured as in the two previous examples, after which the ends of the wire may be tied with string or hinged on wire staples into the angle of the two boards, as seen in our illustration. Allow the wire now to lie flat on the bottom board, and then proceed to tack the netting around the edges of the upright board. Two elastics should next be fastened to the wire on each side, securing their loose ends to the bottom of the trap. They should be tightly drawn so as to bring the wire down with a snap. The spindle of this trap should be about eight or nine inches long, square and slender,—the lower end being flattened, and the upper end secured to the top edge of the upright board by a hinge of leather or string. An excellent hinge may be made with a piece of leather an inch and a half long, by half an inch in width, one half of the length being tied around the end of the spindle, and the other tacked on to the upper edge of the board.
The platform is given by itself at (a) in the same picture. It may be made of very thin wood—cigar box wood, for instance, or even thick pasteboard. It consists of three pieces. The piece which is hinged into the angle of the boards should be about three inches in length; the platform piece ought not to be more than four inches square, and the upright piece only long enough to reach the tip of the spindle when the platform is raised, as shown in our engraving. The hinge piece should be cut to an edge on that end where the leather is fastened, the opposite end being bevelled off in order that the platform may rest and be tacked or glued firmly upon it. The diagram (a) will make this all very clear.
When the platform is all made and fastened in its place, the Page 86 trap may be set. Draw the hoop back as far as possible, and lower the spindle over its edge, catching it behind the upright stick on the platform. If the trap is properly constructed, the pressure of the spindle on the platform will suffice to hold it up as seen in our illustration. The upright stick on the back of the platform should never be more than an inch and a half from the back of the trap. If need be, a slight notch may be made in the end of the spindle and a small tack driven into the back of the upright stick to correspond to it. By thus fitting the notch under the head of the 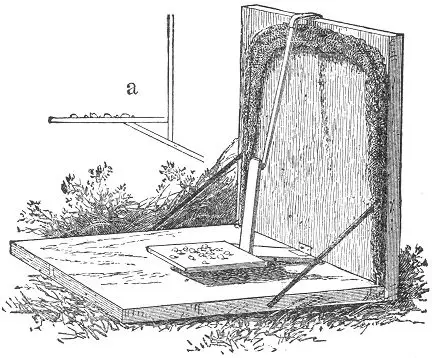 tack, it will be sure to hold the platform in the right position. But it should be carefully tested before setting, to see that it springs easily.
When thus set sprinkle the bait on the platform, scattering a little also on the bottom of the trap and on the ground directly around it. The little birds will soon spy the tempting morsels, and alighting on the trap are misled, and the slightest peck or pressure on the platform where the bait is most bounteously spread brings down the wire and net with a snap, and the little creature is secured without harm.
Our next illustration shows another method of constructing the platform. It should be about three or four inches square, Page 87 and on the middle of one of its edges the upright catch piece should be fastened. This piece, as will be seen in our engraving, should be cut spreading at the bottom so as to admit of being secured to the platform by two brads, the tip being cut to a point. The total length of this piece should not be over two and a half inches. When tacked in place, a third brad should be inserted between the other
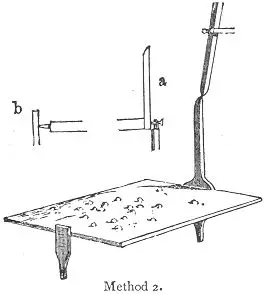
two and exactly in the centre of the side of the platform. This latter brad is to act as the pivot, or hinge, and should project about a quarter of an inch, as seen at (a). On the opposite edge of the platform another larger brad should be driven, having its end filed to a blunt point, as in (b). If the filing would be too tedious, a plug of hard wood of the required shape would answer every purpose. The upright props which support the platform should be cut of thin wood. Let one be an inch and a half long and half an inch wide, the other being an inch in length. Each should have one end whittled to a point, which will admit of its being inserted in a gimlet hole in the bottom of the trap. These gimlet holes should be made at least half an inch in depth. Make the first at about an inch or so from the back of the trap. Into this insert the shorter pieces, broadside front. Lay the pivot brad of the platform on the top of this piece and insert over it a small wire staple, as seen at (a). Elevate the platform evenly and determine the spot for the other gimlet hole, which should be directly beneath the point of the filed brad. Be sure that it is in the middle of the board, so that the platform may set squarely, and be perfectly parallel with the sides. Insert the remaining prop in its place, and the platform is complete. The overhanging spindle now requires a little attention. This should be whittled off on each side, bringing it to a point at the tip. On each side of the spindle a long plug should then be driven into the back piece, as our illustration shows. These should be far enough apart to allow the spindle to pass easily between them. The setting of the trap is plainly shown in our Page 88 engraving. The spindle being lowered between the plugs is caught finely on the tip of the catch-piece. The blunt point at the opposite end of the platform should have a slight hollow made for it in the prop against which it presses. If the platform be now strewn with bait, the little machine is ready. It is certainly very simple and will be found very effective.
THE BOX OWL TRAP.
The use of a box trap for the capture of an owl is certainly an odd idea, but we nevertheless illustrate a contrivance which has been successfully used for that purpose.
The box in this case should be of the proportions shown in our engraving, and well ventilated with holes, as indicated. (This ventilation is, by-the-way, a good feature to introduce in all traps.) Having made or selected a suitable box—say, fourteen or more inches wide, provided with a cover, working on a hinge—proceed to fasten on the outside of the lid a loop of stiff wire, bent in the shape shown at (e). This may be fastened to the cover by means of small staples, or even tacks, and should project over the edge about two inches. When this is done, the lid should be raised to the angle shown in our illustration, and the spot where the end of the wire loop touches the back of the box should be marked and a slit cut through the wood at this place, large enough for the angle of the loop to pass through. Two elastics should now be fastened to the inside of the box, being secured to the bottom at the side, and the other to the edge of the cover, as seen in the illustration. They should be sufficiently strong to draw down the cover quickly. The perch, or spindle, should consist of a light stick of wood, as shown at (b,) one end provided with a slight notch, and the other fastened to the inside of the front of the box by a string or leather hinge, (c,) keeping the notch on the upper side of the stick. It will be now seen that by opening the cover, until the loop enters through the groove, and by then hooking the notch in the spindle under the loop as seen at (a) the trap will be set, and if properly done it will be found that a very slight weight on the spindle will set it free from the loop and let the cover down with swiftness.
To secure the cover in place a small tin catch should now be applied to the front edge of the box, as shown in the illustration. A piece of tin two inches in length by a half an inch in breadth will answer for this purpose. One end should be bent Page 89 down half an inch at a pretty sharp angle, and the other attached by two tacks, to the edge of the box, in the position shown in the cut. This precaution will effectually prevent the escape of whatever bird, large or small, the trap may chance to secure. It is a necessary feature of the trap, as without it the elastics might be torn asunder and the lid thereby easily raised.
This trap may be baited in a variety of ways. As it is particularly designed for a bird trap, it is well to sprinkle the bottom of the box with berries, bird-seed, small insects, such as crickets, 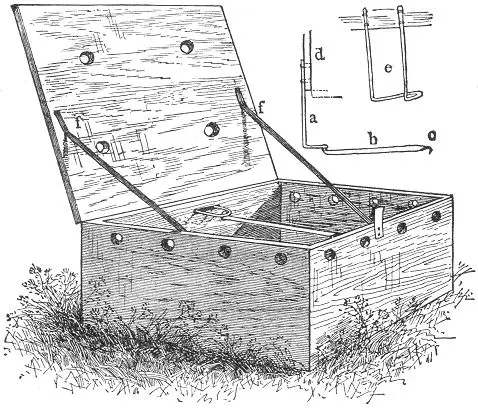 grasshoppers, etc. These latter are very apt to jump out, and it may be well to fasten one or two of them to the bottom with a pin through the body, just behind the head.
There are many kinds of birds which live almost exclusively on insects; and as this bait is of rather a lively kind, there is scarcely any other method to retain them in their position. A bird on approaching this trap will almost irresistibly alight on the perch, and if not at first, it is generally sure to do so before long. If desired, a pasteboard platform may be fastened on Page 90 the top of the perch with small tacks, and the bait scattered upon it. This will act in the same manner, and might, perhaps, be a trifle more certain. We will leave it to our readers to experiment upon.
We have given this variety the name of “owl-trap,” because it may be used with success in this direction. When set for this purpose, it should be baited with a live mouse, small rat or bird, either fastened to the bottom of the trap, if a bird, or set in with the trap inclosing it, if a mouse. A small bird is the preferable bait, as it may be easily fastened to the bottom of the box by a string, and as a general thing is more sure to attract the attention of the owl by its chirping.
The trap should be set in an open, conspicuous spot, in the neighborhood where the owls in the night are heard to “hoot.” The chances are that the box will contain an owl on the following morning.
This bird is a very interesting and beautiful creature, and if our young reader could only catch one, and find rats and mice enough to keep it well fed, he would not only greatly diminish the number of rats in his neighborhood, but he would realize a great deal of enjoyment in watching and studying the habits of the bird.
Should it be difficult to supply the above mentioned food, raw meat will answer equally well. The bird should either be kept in a cage or inclosure and in the latter case, its wings will require to be clipped.
THE BOX BIRD TRAP.
Here we have another invention somewhat resembling the foregoing. Our engraving represents the arrangement of the parts as the trap appears when set.
The box may be of almost any shape. A large sized cigar box has been used with excellent success, and for small birds is just the thing. The cover of the box in any case should work on a hinge of some sort. The trap is easily made. The first thing to be done is to cut an upright slot, about two inches in length, through the centre of the backboard, commencing at the upper edge. To the inside centre edge of the cover a small square strap, about four inches in length, should then be secured. It should be so adjusted as that one-half shall project toward the inside of the box, as seen in the illustration, and at the same time pass easily through the slot beneath where the cover Page 91 is closed. The lid should now be supplied with elastics as described in the foregoing. Next in order comes the bait stick. Its shape is clearly shown in our illustration, and it may be either cut in one piece or consist of two parts joined together at the angle. 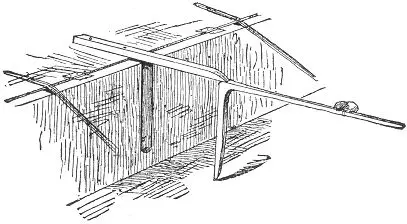 To the long arm the bait should be attached and the upright portion should be just long enough to suspend the cover in a position on a line with the top of the box. The trap may now be set, as seen in our illustration, and should be supplied with the necessary tin catch, described in the foregoing.
THE PENDENT BOX TRAP.
This invention is original with the author of this work, and when properly made and set will prove an excellent device for the capture of small birds.
The general appearance of the trap, as set, is clearly shown in our illustration. A thin wooden box is the first requisite, it should be about a foot square and six inches in depth, and supplied with a close fitting cover, working on hinges. The sides should then be perforated with a few auger holes for purposes of ventilation.
Two elastics are next in order, and they should be attached to the cover and box, one on each side, as shown at (a.) They should be drawn to a strong tension, so as to hold the cover firmly against the box.
The mechanism of the trap centres in the bait stick which differs in construction from any other described in this book.
It should be made about the size of a lead pencil, and eleven Page 92 inches or so in length, depending of course upon the size of the box.
It should then be divided in two pieces by a perfectly flat cut, the longer part being six inches in length. This piece should be attached to the back board of the box by a small string and a tack, as shown at (c), its end being bluntly pointed. Its attachment should be about five inches above the bottom board, and in the exact centre of the width of the back.
Near the flat end of the other piece the bait consisting of a berry or other fruit, should be secured, and the further extremity of the stick should then be rounded to a blunt point. The trap is now easily set. Raise the lid and lift the long stick to the position given in the illustration. Adjust the flat end of the bait stick 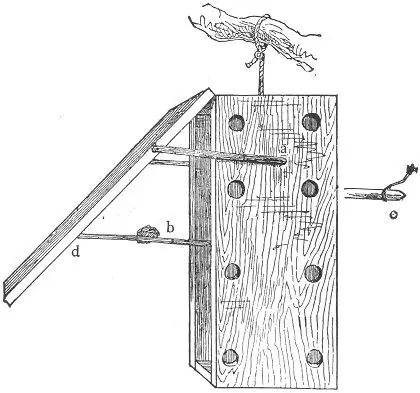 against that of the former, and allow the pressure of the lid to bear against the blunt point of the short stick at (d), as shown in the illustration, a straight dent being made in the cover to receive it, as also in the back of the box for the other piece. If properly constructed, this pressure will be sufficient to hold the sticks end to end, as our engraving Page 93 represents, and the trap is thus set. The slightest weight on the false perch thus made will throw the parts asunder, and the cover closes with a snap.
The greatest difficulties in constructing the trap will be found in the bearings of the bait sticks (b), the ends of which must be perfectly flat and join snugly, in order to hold themselves together. The box may now be suspended in a tree by the aid of a string at the top. The first bird that makes bold enough to alight on the perch is a sure captive, and is secured without harm. If desired, the elastic may be attached to the inside of the cover, extending to the back of the box, as seen in the initial at the head of this chapter. If the elastic in any event shows tendencies toward relaxing, the tin catch described on page 88 should be adjusted to the lower edge of the box to insure capture.
THE HAWK TRAP.
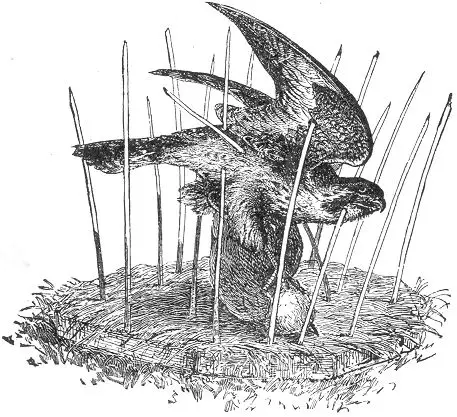
Our illustration represents a hawk in a sad plight. The memory of a recent feast has attracted it to the scene of many of Page 94 its depredations: but the ingenious farmer has at last outwitted his feathered foe and brought its sanguinary exploits to a timely end. This trap is a “Yankee” invention and has been used with great success in many instances where the hawk has become a scourge to the poultry yard. The contrivance is clearly shown in an illustration, consisting merely of a piece of plank two feet square, set with stiff perpendicular pointed wires.
This affair was set on the ground in a conspicuous place, the board covered with grass, and the nice fat Poland hen which was tied to the centre proved a morsel too tempting for the hawk to resist. Hence the “fell swoop” and the fatal consequences depicted in our illustration. The owl has also been successfully captured by the same device.
THE WILD DUCK NET.
Following will be found two examples of traps in very common use for the capture of wild ducks, and in the region of Chesapeake bay, immense numbers of the game are annually taken by their aid. The first is the well known net trap, so extensively used in nearly 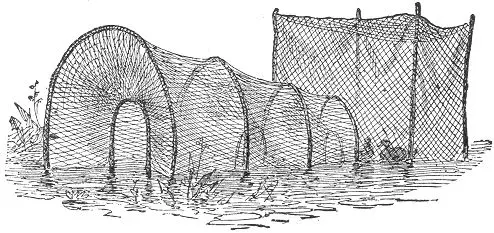 all countries, both for the capture of various kinds of fish as well as winged game. Our illustration gives a very clear idea of the construction of the net, and an elaborate description is almost superfluous. It consists of a graduated series of hoops covered by a net work. From each a converging net extends backward ending in a smaller hoop which is held in position by cords extending therefrom to the Page 95 next larger hoop. The depth of these converging nets should extend backward about three or four feet from the large hoop; and the distance between these latter should be about five feet. The length of the net should be about twenty feet, terminating in a “pound” or netted enclosure, as seen in the illustration. The trap may be set on shore or in the water as seen. “Decoy” birds are generally used, being enclosed in the pound.
When set on land the bait consisting of corn or other grain should be spread about the entrance and through the length of the net.
It is remarkable that a duck which so easily finds its way within the netted enclosure, should be powerless to make its escape, but such seems to be the fact, and even a single hoop with its reflex net, has been known to secure a number of the game.