 Doomsday Defense
Historical text (1965). Processing times are from 1965. Tomato acidification and many vegetable times have changed since; check against the current USDA Complete Guide to Home Canning.
Home Canning of Fruits and Vegetables · 1965
Getting Your Equipment Ready
Steam-Pressure Canner
For safe operation of your canner, clean petcock and safety-valve openings by drawing a string or narrow strip of cloth through them. Do this at beginning of canning season and often during the season.
Check pressure gage.—An accurate pressure gage is necessary to get the processing temperatures needed to make food keep.
A weighted gage needs to be thoroughly clean.
A dial gage, old or new, should be checked before the canning season, and also during the season if you use the canner often. Ask your county home demonstration agent, dealer, or manufacturer about checking it.
4
If your gage is off 5 pounds or more, you’d better get a new one. But if the gage is not more than 4 pounds off, you can correct for it as shown below. As a reminder, tie on the canner a tag stating the reading to use to get the correct pressure.
The food is to be processed at 10 pounds steam pressure; so—
If the gage reads high—
1 pound high—process at 11 pounds.
2 pounds high—process at 12 pounds.
3 pounds high—process at 13 pounds.
4 pounds high—process at 14 pounds.
If the gage reads low—
1 pound low—process at 9 pounds.
2 pounds low—process at 8 pounds.
3 pounds low—process at 7 pounds.
4 pounds low—process at 6 pounds.
Have canner thoroughly clean.—Wash canner kettle well if you have not used it for some time. Don’t put cover in water—wipe it with a soapy cloth, then with a damp, clean cloth. Dry well.
Water-Bath Canner
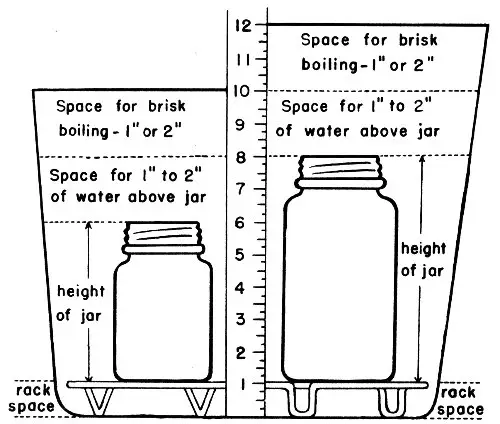
Water-bath canners are available on the market. Any big metal container may be used as a boiling-water-bath canner if it is deep enough so that the water is well over tops of jars and has space to boil freely. Allow 2 to 4 inches above jar tops for brisk boiling (see sketch). The canner must have a tight-fitting cover and a wire or wooden rack. If the rack has dividers, jars will not touch each other or fall against the sides of the canner during processing.
If a steam-pressure canner is deep enough, you can use it for a water bath. Cover, but do not fasten. Leave petcock wide open, so that steam escapes and pressure does not build up inside the canner.
76892B
Space for brisk boiling—1″ or 2″
Space for brisk boiling—1″ or 2″
Space for 1″ to 2″ of water above jar
Space for 1″ to 2″ of water above jar
height of jar
height of jar
rack space
rack space
Glass Jars
Be sure all jars and closures are perfect. Discard any with cracks, chips, dents, or rust; defects prevent airtight seals.
Select the size of closure—widemouth or regular—that fits your jars.
Wash glass jars in hot, soapy water and rinse well. Wash and rinse all lids and bands. Metal lids with sealing compound may need boiling or holding in boiling water for a few minutes—follow the manufacturer’s directions.
If you use rubber rings, have clean, new rings of the right size for the jars. Don’t test by stretching. Wash rings in hot, soapy water. Rinse well.
Tin Cans
Select desired type and size.—Three types of tin cans are used in home canning—plain tin, C-enamel (corn enamel), and R-enamel (sanitary or standard enamel). For most products plain tin cans are satisfactory. Enameled cans are recommended for certain fruits and vegetables to prevent discoloration of food, but they are not necessary for a wholesome product.
The types of cans and the foods for which they are recommended are:
5
| Type | Recommended for— |
|---|---|
| C-enamel | Corn, hominy. |
| R-enamel | Beets, red berries, red or black cherries, plums, pumpkin, rhubarb, winter squash. |
| Plain | All other fruits and vegetables for which canning directions are given in this bulletin. |
In this bulletin, directions are given for canning most fruits and vegetables in No. 2 and No. 2½ tin cans. A No. 2 can holds about 2½ cups, and a No. 2½ can about 3½ cups.
Use only cans in good condition.—See that cans, lids, and gaskets are perfect. Discard badly bent, dented, or rusted cans, and lids with damaged gaskets. Keep lids in paper packing until ready to use. The paper protects the lids from dirt and moisture.
Wash cans.—Just before use, wash cans in clean water; drain upside down. Do not wash lids; washing may damage the gaskets. If lids are dusty or dirty, rinse with clean water or wipe with a damp cloth just before you put them on the cans.
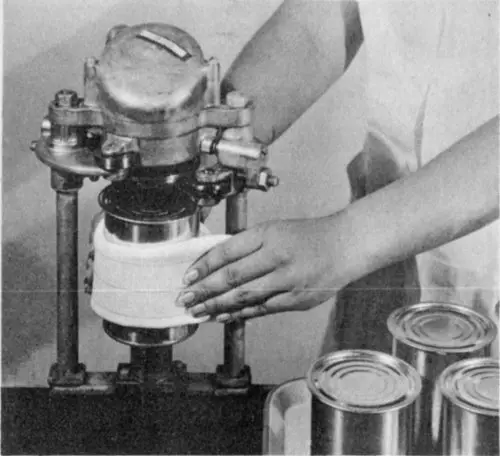
Check the sealer.—Make sure the sealer you use is properly adjusted. To test, put a little water into a can, seal it, then submerge can in boiling water for a few seconds. If air bubbles rise from around the can, the seam is not tight. Adjust sealer, following manufacturer’s directions.
76627B
A can sealer is needed if tin cans are used.